Hot box cooking

Cooking in a hot box / hot bag saves electricity while reducing our carbon footprint. Food takes only slightly longer to cook than on the stove, and can be left unattended (it doesn’t burn or boil over, and doesn’t need to be stirred).

I even find that stews and soups cooked like this tastes better and more fragrant. Rice is more fluffy and evenly cooked.

A hot bag can also be used to keep things cool – more efficiently than a cooler box.

This is the kind of hot box / wonderbag / hay box that one can buy, promoted here by the Department of Economic Development, Tourism and Environmental Affairs.

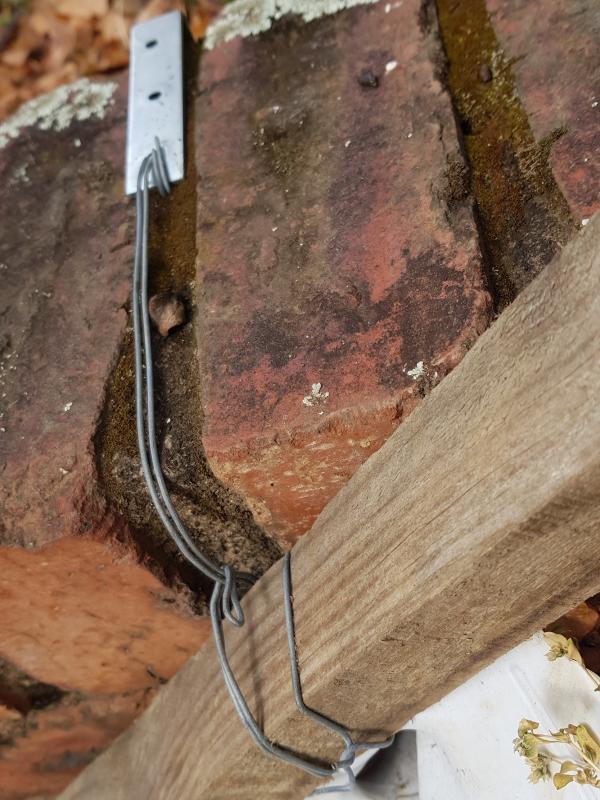
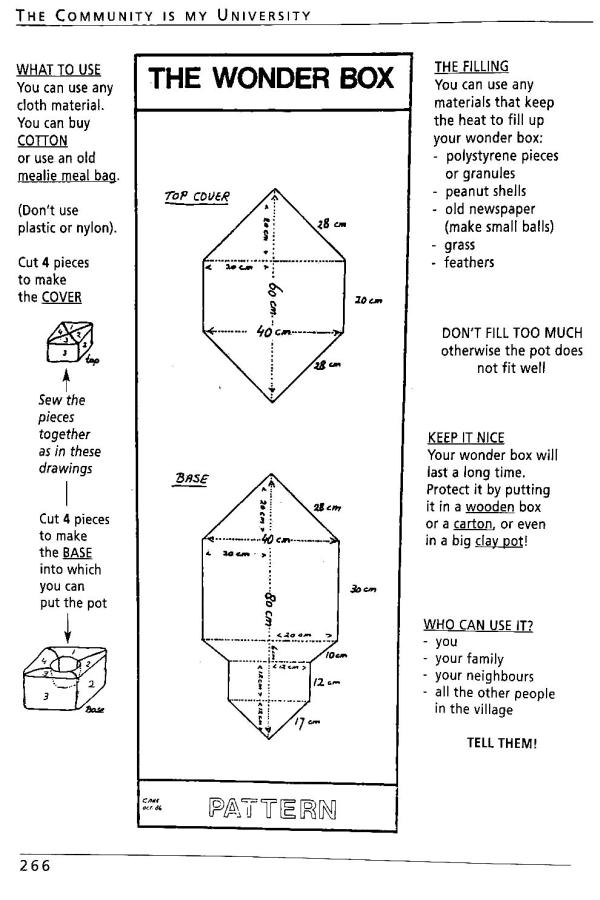
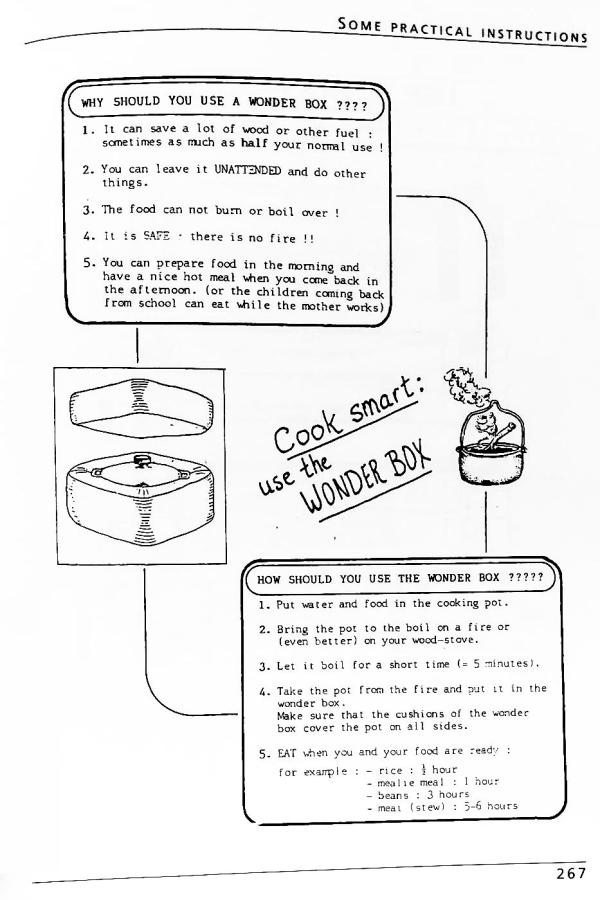
This beautiful book on community development and rural health, has instructions for rural women on how to make a ‘wonder box’ out of old cloth such as old linen mealie meal bags and stuffed with insulating peanut shells, grass, feathers or old newspaper.

You don’t need a box at all though. Some warm blankets work just as well. Hikers know this trick: you only need one little gas cooker for a 3-course meal. Boil a pot of rice, wrap it in your sleeping bag, then prepare your soya mince sauce (which cooks much better, without burning, in another sleeping bag), while you cook the dried vegetables (or make a nice cup of Milo).

Hiking and camping at Mont-Aux-Sources in the Drakensberg.

At sea level, water boils at 100°C. For every 300m rise in altitude, the boiling point of water is about 1°C lower. So at the top of Amphitheatre, at 3200m, water boils at 89°C. At high altitude food simply takes longer to cook – just something to keep in mind.

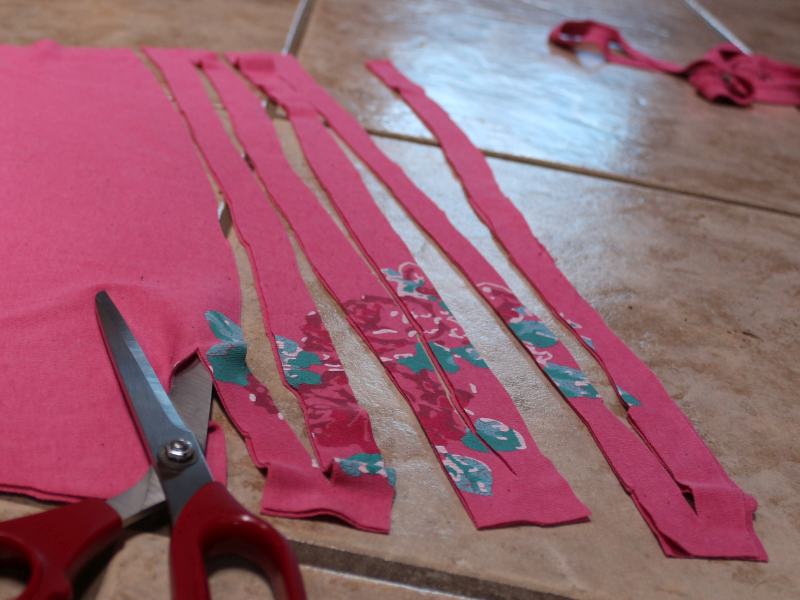
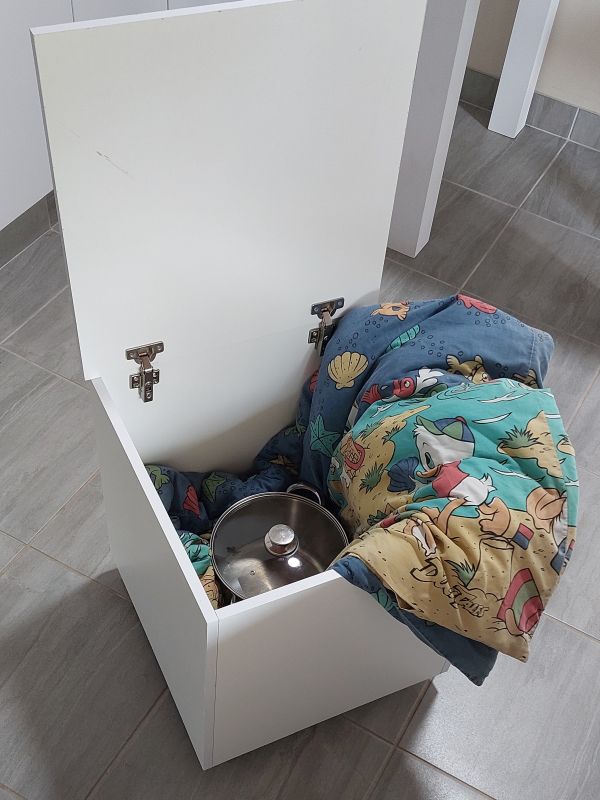
For my kitchen I recycled an old kiddies’ duvet that had gotten lumpy. I use this regularly to cook rice, stews, soups – anything that otherwise needs prolonged simmering on the stove. It really helps during loadshedding: as long as I get the pot boiled before the power goes off, no problem.

I got this fancy solid box made, on wheels, with a lid. It goes under the table, serves as a seat, and when needed, it comes out and becomes an oven.
How much electricity (and carbon dioxide emissions) does a hotbox avoid?

That depends on the kind of stove we are comparing it against, and the kind of food we are cooking. Since one needs to bring the food to the boil either way, the hotbox only saves on the simmering time. Food that only takes 15 min to cook on a stove would save only a little electricity; food that has to cook for hours, saves a lot. So the cooking box is particularly useful for meals that require longer cooking times.

1kWh electricity produces approximately 1kg of carbon dioxide emissions.

For those who like actual numbers, Eskom reports that it produced 198 281GWh of electricity in 2022, with 207.2Mt carbon dioxide emissions (plus 32.90Mt ash and 66.65kt particulate matter). Converted that is 198,281 million kWh and 207,200 million kg. Divide kg by kWh to get emissions per energy used.

A typical 1000W stove plate, if set to maximum heat, would use 1kWh per hour, and produce 1kg of carbon dioxide in emissions. So let’s say you simmer food (on level 3 out of 6) then you can assume a typical 1000W plate will consume approximately 0.5kWh per hour on half heat, which equates to about 0.5kg carbon dioxide. Now do that every day. Perhaps you use more than one stove plate at a time. All that adds up very quickly.

Please have a look at the total kWh on your last monthly electricity bill, and multiply that number by 12 to get the number of kg of carbon dioxide your household adds to the atmosphere every year. Now think: you can do something about that. Just dig out an old blanket and start today!

Previous posts:

Rag rugs

The Internet is full of fantastic ideas for upcycling generally (turning waste into something useful), and rag-rugs specifically. Old T-shirts too stained to pass on as second-hand clothing, still find a use. Stretchy fabric works best. Ideally the fabric should not fray.

Rags to strips

Start by cutting off any seams. Then cut the fabric into strips, in a zig-zag pattern to make one long continuous ribbon. You don’t need to cut straight either, curves is fine.

On fabrics that stretch in one direction only, it is better cutting in the direction of the stretch rather than across it.

The strips can be from 1 to 3cm wide. The thinner the fabric, the wider the strips.

The thicker the yarn, the thicker the final carpet will turn out.

Find a route that has the smallest off-cuts, for instance:

top
sleeve
pants

To save time, fold the fabric in half. Cut from the fold to within 1cm of the edge. Open up the fabric, and snip through to the edge, on alternating rows, to create a continuous strip, like this:

A lovely selection of matching colours.

Strips to yarn

To connect individual strips quickly and easily, loop them through each other. Cut slots into the ends; first push the end of strip A through the slot in B, then pull strip B through the slot in A:

Once I got a huge bag of off-cuts from a T-shirt factory. It took ages to untangle all that cotton Lycra – much longer than it took to crochet the rugs afterwards.

Yarn to rug

If you don’t know how to crochet, check out Sarah‘s blog for example. The simplest crochet pattern starts with a chain, and then works back and forth until the rug is long enough.

The last time I crocheted anything was at age 5.

Here is an alternative pattern for a rectangular rug. Hopefully the instructions make sense. (I am a complete novice and cannot read or write a proper crochet recipe.)

First, mark out on the floor how big you want the rug to be. Mark out two right-angled triangles on each end. Measure how long the starting chain needs to be. Calculate 2cm per stitch.

On this rug the starting chain was 50cm long, about 25 stitches.

Use a 10mm thick crocheting hook.

  • Create a chain (Step 4 on Sarah’s blog)
  • ‘Work into the chain’ (Step 5)
  • As you get back to the beginning, put three stitches in the end loop of the chain (figure A below).
  • Crochet along the chain and do the same on the other end (A).
  • On the next round, add an extra stitch on each of the four corners (B).
  • On the following round, and each round thereafter, add two stitches in each corner (C).
  • With each round, there are two extra stitches on each side of the rectangle (D).
  • When the rug is big enough, or you run out of yarn, fasten off (Step 9).

I love my colourful rug!

Bottle garden

In a city, one doesn’t always have access to a vegetable patch. But vertical gardens are a great way to grow food on hot, sunny walls.

Here is a 4min video of how to make this fully functional drip-irrigated vertical vegetable garden using recycled 2L plastic milk bottles.

On the Internet there are many different ideas and designs for vertical bottle gardens. Some of them are quite complicated, and need lots of hardware. My aim is always to spend as little time, money and energy as possible, and to recycle junk that is lying around anyway. Plus it must actually work. Tried and tested.

I started experimenting back in 2019. The first design was a flop. Ok I managed to grow a crop of veggies, but (a) each bottle had to be watered individually (groan!), (b) the water simply dripped out the bottom (leeching the soil), (c) the soil shrank in the bottle as it dried leaving a gap, so the water would just run around the soil without getting absorbed, (d) … anyway, there were other drawbacks that are not worth listing.

This arrangement was ultimately not successful.

The only part that really worked was the idea to use wire and square metal brackets hung loosely over the top of the wall, to hold up the bottle racks, instead of drilling and screwing anything permanently into the bricks. This system was quick and easy to put up, move and importantly – remove. On house walls one could hold up the rack by wires attached to roof rafters or window sills.

As for the bottles – after much head-scratching and fiddling, I came up with a much better system: a row of bottles, connected to each other and set up at an angle, like so:

The end bottle is the reservoir. Simply fill up this tank with water. The lid has holes punched in it. The water gently irrigates the first bottle, then dribbles slowly from one bottle to the next. Reduce the flow from the tank by blocking some of the holes with toothpicks.

A container at the bottom collects the overflow – a nutrient-rich tea, which can be poured back in the top, to recycle nutrients.

Watering is quick and easy, but the actual irrigation is slow, and the soil gets a thorough soaking. As a result it stays wet longer. You can even control the moisture level: the steeper the angle of the rack, the better it drains. If you lower the rack, more water pools in each bottle. This helps fully grown plants to cope in the heat of summer. (But avoid water logging.)

I have successfully grown several crops of vegetables: lettuce, spinach, various herbs (parsley, dill, chives, leeks, basil), celery, also green beans, radish. Even cauliflower – though the monkeys got to them first.

Cucumbers also grow very well in bottles: set up two racks about 2m apart, and zig-zag a string between them. This works for runner beans too. Just help each plant to find the right path.

Soil quality is something I am still learning about. Diluted urine, bone meal, wood ash and Epsom salt are organic alternatives to artificial fertilizer. But I have found it is easy to overfertilize, because nutrients cycle around this self-contained unit. It is probably best to replace the soil once a year, mixing in fresh compost, and rotating crops. The plastic bottles also become brittle from the sun and don’t last longer than two seasons.

On 1 November is World Vegan Day. We are not vegans, but I respect the choice. This blog is my salute to you, Douglas, Glenda, Shannon, Chloe and others. I share your love for veggies.

by Marlies Craig